Showing posts with label Others. Show all posts

Sunday, March 31, 2019

Link Your PAN Card to Aadhaar Card 2021

-: Introduction :-

Hello Readers, I am ALOK GARIA the admin of this blog. I want to inform you that this blog post is all about the PAN card holder. If you are a PAN card holder then i will describe you that how you can link your Permanent Account Number Card (PAN Card) to your Aadhaar card in your mobile or in PC. So link your Aadhaar to your PAN as soon as you can. On failing to link Aadhaar and PAN can leads to suspension or deactivation of your PAN. So do the process as quickly as possible.


How to link :

Step 1 :

  • Keep your PAN and Aadhaar card in front of you. Now open your browser and search Income Tax.


Step 2 :

  • Now the search result will open. Click on the first link of that search results to go to the official website. The first link will look like the below image.
  • The full view of the website of income tax will look like the below image.


Step 3 :

  • Now look at the left sidebar of the official website. You will see a quick link tab in which the hyperlink of aadhaar linking is given as Link Aadhaar. It will look like the below image.
  • Now click on that Link Aadhaar option and you will be redirected to a form page which will look like the below image.

Step 4 :

  • To check your PAN Aadhaar linking status click on the blinking Click Here option on the PAN Aadhaar linking form page. A new form will be opened which will look like the below image.
  • On the aadhaar status form fill your PAN and Aadhaar number and click on View Link Aadhaar Status. If you have linked your Aadhaar with your PAN successfully before then it will show a green dialogue box which will look like below image.


Step 5 :

  • If you have not linked your aadhaar with your PAN then go to the Home page and click on Link Aadhaar on the left sidebar. Now the Aadhaar linking form will be opened.
  • You have to fill some details like
  1. Your PAN Card Number
  2. Your Aadhaar Number
  3. Your Name as per your Aadhaar Card
  4. Check the Box if you have only year of birth on your aadhaar card
  5. Check the box on Agree to validate your Aadhaar details with UIDAI
  6. Enter the Captcha Code
  7. Finally Click on Link Aadhaar
  • Your Aadhaar card will be linked with your PAN card.

Step 6 :

  • Again repeat Step 4 to cross verify your aadhaar linking status. If it is not verified then wait some time and check again. And if it is verified then enjoy.


My Words For You :

  • Thats all for todays topic. I hope that you will understand the whole process.
  • If you have learned something from my blog then its an honour for me as an admin of this blog.
  • Thnx for giving your valuable your valuable time. Dont forget to leave your valuable comment.
  • I will try my best to upload more tutorials like this.   
{{ GOOD BYE }} 


Monday, March 4, 2019

RRB Group D result Out : Check Now


Introduction :

Hello friends , I am ALOK GARIA the admin of this blog. I want to inform you about that this blog post is all about how to check  the results of RRB Group D (CEN 2 / 2018) 1st stage CBT exam which was conducted between 17th september 2018 to 17th december 2018. The Railway Recruitment Board have decleared the result on date 4th march 2019. In this blog post i will show you that how to check the Group D results in mobile or in PC.
You can check your results by going to the official websites of any RRBs.In this particular case i will use the official website of RRB Bhubaneswar.


 Follow The Below Steps To Check The Results :

1 : First turn on your devices internet connection and open your favourite browser.
2 : Now open Google by typing google.co.in in your browsers search bar. 
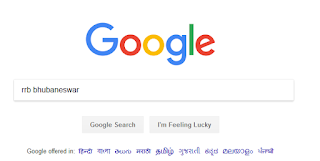
3 : Now type your RRB name which you have concerned. You can check your results from the official websites of any RRBs. In this case i am using the official website of RRB Bhubaneswar. A screenshot is given below.
4 : Now click on Search. The link of the official website will show on the top of the search results. The link will look like the below screenshot.
5 : Click on that link. You will be redirected to the official website in a few seconds. The official website of RRB Bhubaneswar looks like below screenshot.
6 : Now click on the option 3 to check your score and shortlist status which is showing that [ Click here to view the normalised score and shortlist status for PET. ]
7 : Now a login page will open, where you have to provide the login details. The type of login details are provided below.


Things Required To Check result :

1 : The registration Number which you have provided during the online application.
2 : The Date of Birth which you have opted during the online application.  

What Can You View :

1 : You can view the list of candidate shortlisted for physical efficiency test (PET).
2 : You can view the normalised cutoff marks for the PET ( Physical Efficiency Test )
3 : You can view your normalised score and shortlist  status for PET .
4 : You can view the notice containing the links of the official website of all RRBs.

NOTE : You can directly go to the official website by clicking the link from below table. The link to view the normalised score and shortlist status will live till 15th march 2019.


Name Of RRB Official Website
RRB Ahmedabad
RRB Ajmer
RRB Allahabad
RRB Bangalore
RRB Bhopal
RRB Bhubaneswar
RRB Bilaspur
RRB Chandigarh
RRB Chennai
RRB Guwahati
RRB Jammu
RRB Kolkata
RRB Malda
RRB Mumbai
RRB Muzaffarpur
RRB Patna
RRB Secunderabad
RRB Siliguri
RRB Thiruvananthapuram

Demo Gif :


Saturday, February 9, 2019

How to type Odia without any software 2019 (Google Tricks)

Hy friends,
          welcome back to my blog again. I am ALOK GARIA, the admin of this blog.I have a best trick for multi language content writing which is necessary for the bloggers as well as students who write multi language posts. Almost all the computers and the mobile in any country supports english language, so all the keyboard generally comes with english letters. For multi language content writer it is necessary to use software like Akruti to write their content, but i have a trick with which any one can write multi language post without using any software. We will use google as our writing tool. In this post we will learn about how to write odia.

What will we use to write Odia ?

    Despite Odia is a official language of the state Odisha and also a major language of India, which have a native speaker of 33 million people, it is not available in Google Translate. So we will use a different method to write Odia.
Since the language Odia is very rich in vocabulary it is too hard to program the database of each and every word of Odia in google translate. It is work in progress by google. I hope it will be available in google translate soon. Till then we will use a program provided by google named ODIA GOOGLE.

Requirements :

1 : An Android mobile or a PC or a Laptop
2 : A web browser like Mozilla Firefox or Google Chrome ( other browser also can be used )
3:  A speed internet connection

 How to Use :

1 : Turn on your devices internet connect connection and turn on your web browser. That may be mozilla firefox or google chrome or opera or other browser.
2 : now search for google.com.
3 : Then type Odia Google. A screenshot is given below.
4 : Now click on search button . It will show you the search results.
5 : Now click on the very first link that appears in your search results. A sereenshots of that is given below.
6 : After clicking the Google Odia Converter will be displayed. A screenshot of that is given below.
7 : Now type your desired text in english and it will translate it to odia. A screenshot of that is also given below.
8 : Now copy the written text to your blog post or notepad. Thats all you will write Odia without using any softwares.

How To Write on Odia Google :

1 : First Open the Odia Google.
2 : Now write the text in below format

=>If you want to write  [ ଓଡ଼ିଆ ] then type [ Odia ] and hit enter.
=>If you want to write  [ ତୁମ ନାମ କଣ ] then type [ Tuma Nama Kana ] and hit enter.
=>If you want to write  [ ତୁମେ କିଏ ] then type [ Tume Kie ] and hit enter.
=>If you want to write  [ ମୋର ନାମ କାଳିଆ ] then type [ Mora Nama Kalia ] and hit enter. 

Tutorial :


My Words For You :

=>Thats all for today's topic. I hope that you will understand the whole process. If you have learned something from my blog then its an honour for me as an admin of this blog. Thnx for giving your valuable time.Don't forget to leave your valuable comment.
=> I will try my best to upload more tutorials like this.

[[ GOOD BYE ]]


Saturday, November 24, 2018

Your Whatsapp Account is Going to be Blocked. Know Why ?


Intro  : 

Hi, i am ALOK GARIA the admin of this blog.In this article we will discuss about some serious terms and conditions/privacy policy of whatsapp. if you do against such terms and condition/pravicy policy then  your whats app account will also be blocked without giving notice.As a whatsapp user you must know that whatsapp is continuously tracking your activity, So careful about the whatsapps  privacy policy. Want to know such things then read the full article carefully.

Terms And Condition/pravicy policy :

: If you do illegal comments, hateful comment ,defame someone ,harassing message  then there
 is a probability that your whatsapp account will be blocked because whatsapp is now continuously
 monitoring its users message.
: If you forward the message which are promoting crime activities to your contacts then there is
a possibility that your account will be blocked.

: If you are using fake whatsapp account such as you are changing your gender, name, locality,
religion then there is also a possibility that your account will be blocked.
: And the most important point, if you are texting extremely high amount to those people who
are not even in your contact list then whatsapp will list you in the fake account list and you will be
blocked by whatsapp.
: If you are trying to edit the source code of whatsapp app then it is a crime because whatsapp is
not a opensource platform and it is owned by facebook.If you do such things then whatsapp will
recognize you and you will be blocked.
: If you share malwares and viruses using whatsapp then you will also be blocked because you are
causing damage to others by sharing these things and it is completely illegal.
: If you try to spy or hack the server of whatsapp and recognized by whatsapp then your account
will be blocked immediately.

: If your account is reported by many personals and also being blocked continuously by a particular
user then your account will be blocked by whatsapp.
: Whatsapp says that if you will use third party whats app like whatsapp plus, GB Whatsapp etc then your account will be blocked without notifying you.Please use genuine whats app because the third party whatsapps are not safe.if you use third party apps then there is a threat to your privacy.
: One last information, Since whatsapp starts monitoring you, don't share your private image ,
audio file etc etc.
 

  If you don't want to invite problems then control yourself  from doing such things.

My Words For You :

That's all for today's topic. I hope that you will understand the whole things in whatsapp which you should not do. If you have learned something from my blog, then its an honor for me as an admin. Keep visiting to my blog, keep supporting. 

[[ GOOD BYE ]] 

Thursday, November 22, 2018

Download Latest Movies in Full HD Format 2018

Intro : 

  Hi friends. i am ALOK GARIA the admin of this blog. In this blog post we will discuss about how we can download latest movie in HD format that may be Hollywood or Bollywood. So follow the below steps properly to download your desired movie.

Things Required :

1 : An Android Mobile or a Laptop or a Desktop PC
2 :  A secure VPN  [ That may be free or paid ]
ex : Hola VPN (free) , Turbo VPN (free) , etc.
3 : A Fast internet connection


 Steps To Download Movie :

1 : Turn on your internet connection and download the VPN by going to the official site of that VPN . That may be free or Paid. In my case i will use Hola VPN. A screenshot is given below.
2 : Or if you are using a PC or a Laptop then open your favourite browser and add the hola extension to that browser.
3 :Now configure the settings. Change the server to United states/United Kingdom/Canada/Switzerland ,or wherever you want except india.
4 : Now open google and browse a website named  http://worldfree4u.club .A screenshot is given below.

5 : Now click on te first link of the search result page. a screenshot is provided for reference below.
6 : Now open the site and search for your desired movie. If you are searching for latest movie then it will show on the home page of the website.
7 : Now click on the Movie heading. it will redirect you to the next page. Now scroll down and find the Download links option and click on that link.
8 : Now it will redirect you to the website where the links are kept. Now click on the unlock links to view the links. a screenshot is provided below for reference purpose.


9 : Now click on one of the links to download the movie file and click in the download button there. A screenshot is given below for the reference.
10 : After clicking on the download now button a download link will be generated and it will show the details of the movie and a download button like below screenshot.
11 : Thats all. Now click on the the download button and wait for few seconds. The download will automatically starts if you are using mobile device and if you are using Pc then it will show the download menu.

My Words For You :

 That's all for today's topic. I hope that you will understand the whole process of download movie in HD format. If you have learned something from my blog, then its an honor for me as an admin. Keep visiting to my blog, keep supporting. 

[[ GOOD BYE ]]


Saturday, November 17, 2018

How To Check Railway RPF Roll No in Mobile 2018

Intro : 

Hi Friends, welcome back to my blog again. I am ALOK GARIA , admin of this blog. I have a good news for you and that is about your RPF application. Indian railway has recently updated the examination roll no of the candidates who have applied for RPF SI/Constable. If you have applied for RPf then you can also check your examination roll no in your mobile. To check you roll no in mobile follow the below steps.

Follow the steps to check manually :  

1 : Go to any of your mobile browser and open google search page . Then type RPF Login on the search tab. The screenshot is given below.
2 : Now click on search button. Then a new screen will open containing your search related topics. Then click on the first link of that new window. The detailed screenshot is given below.
3 : Now the official website of RPF will open. Now scroll down the website and click on the "Scrutiny status and roll no" option. If you want to print your application then you can click on the "Print Application" option. A screenshot is given below to ease your experience.
4 : Now you will be asked to select your Railway group/Zones . Scroll down the page and choose your railway zone which you have opted and click on it. A screenshot is given below.

5 : after selecting your railway zone a new login page will open like the below screenshot. Fill your registration ID and also your date of birth. Fill the captcha and click on login
6 : After logging in your application status and your roll no will be displayed to you. If your application will be accepted the it will show in green colour that your application is provissionally accepted. A screenshot is given below.
7 : Your roll no will be shown like below screenshot.
8 : If you follow the above steps carefully then definitely you will be able to check your roll no in your smartphone. The direct links of the login panels of different railway zones are given below.

Direct links for Login Page :


 Thats all for todays topic. stay tuned with our website for more updates about the exam date and admit card release date. Thanx for visiting. 

[[ GOOD BYE ]]

Thursday, July 12, 2018

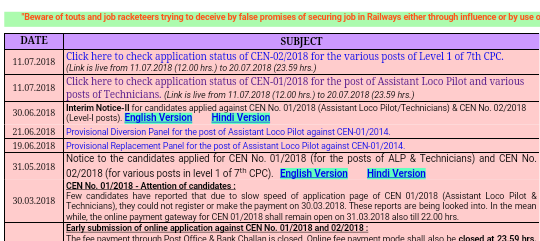
How To Check Application Status of Group-D/ALP Technician 2018

Intro :

         Hii Friends, Welcome back to my blog again. I am Alok Garia ,editor of this blog. I have a good news for you and that is about your application status of Railway Group -D / ALP Technician. Indian railways have released a notification on 11th July 2018 in which you can check your application status for CEN 1/2018 and CEN 2/2018. So follow the below steps to check your status for respective CEN.

How To Check :

To check you application status you can click on the below link or you can follow the below.


Follow the steps to check manually :

1 - Go to you mobile browser and search in google like below img.
2 - Now click on the first link of your search result.
3 - Now click on your respective notification. For Group-D click on the 1st notification and for ALP/Technician click on the 2nd link fron the top of notification table.
4 - A new page will be opened like below img. Now select the zone for which you have applied.
5 - Now fill your details like Registration number ,date of birth ,Captcha code and click on submit.
6 - If your application is accepted then it will show as below image otherwise it will show rejected. 
7 - Thats all ,if your application is accepted then you are eligible to appear the exam.

Expected reasons for which application is rejected :

1-Black and White Photograph is uploaded
2-Photo with Caps and Goggles is uploaded
3-Disfigured Photograph uploaded
4-Photograph with small size is uploaded
5-Full Body or one side view of photograph is uploaded
6-Unrecognizable photograph uploaded
7-Photostat copy of required photograph is uploaded
8-Group Photograph uploaded
9-Photograph without Name and Date is uploaded
10-Photograph taken using a Mobile Phone
Self-Composed Portrait is uploaded
11-photograph with colourful background

# If a candidate submits multiple number of applications to the same and different RRBs. Doing this will reject your form also he/she will be debarred from the future Railway Recruitment.

Thats all for today's topic. Stay tuned with our website for more updates about the exam date and admit card release date. Thanx for watching

《 GOOD BYE 》

Saturday, July 7, 2018

How to use free internet -via VPN tunnel ( latest trick 2018)

How to use free internet : Latest trick 2018


Hy friends, Welcome back to my blog again. I am Alok Garia  the admin of this blog. Today i am going to tell you that how you can use free internet in Airtel sim via a VPN tunnel .So come to our today's topic...........

Requirements :

1 - An android mobile ( that may be 2G/3G/4G )
2 - An airtel sim with zero balance ( make sure that you have zero balance left in your airtel sim otherwise your main balace will be deducted )
3 - Universal VPN Revision app  (  )
4 - and most important is patience 

How To Use :


1 - To use free internet in airtel sim first make sure that you have no balance left in your mai balance. If you have balance left in your sim card then don't worry, there is a trick for you also guys. Follow my below instruction to keep safe your main balance.
2 - If you have balance left then go to the message>new message box and type STOP and send it to 1925 .
Example is given in the below screenshot. 


3 - Now turn on your mobile data and open the Universal VPN Revision Lite app. 
4 - After a while the handler menu will be opened and it will look like the below screenshot. 


5 - Now configure the handler menu like given below.

Remove port :  Tick on the  remove port Option

Proxy Type : choose Real Host

Proxy Server :   56789.airtel.in


6 - Now scroll down below and click on OK .
7 - After a while a new popup will be opened. Then Click on the Tunnel Whole Device Mode button of that popup. A screenshot of that is given below.


8 - Now give the permission to the VPN tummel by clicking ok of the next popup.
A screenshot of that is given below. 

9 - Thats all you can use internet in whole device mode once the connect button becomes green and below the button "Disconnected" is written. A screenshot of that is also given below.


10 - Now you can use all the feature app like facebook , whats app , chrome , youtube , etc.

Some Additional Proxy Server :

1 - one.airtel.in

2 - buddies.airtelmoney.in

3 - 180.179.108.50

4 - 125.21.246.99

Precaution :

1 - Before turning on your mobile data make sure that you have no balance left in your sim card or if you have balance then you have done what is explained in step 2.
2 - Don't quit the tunnel, unless it won't work. First minimize the app then open any app and browse internet.

Disclaimer :


This post is for study purpose only. Don't misuse of it. For any type of criminal activity i am not responsible. Again i am saying that don't use it for criminal practice.

My Words For You :

Thats all for today's topic. I hope that you will understand the whole process. If you have learned something from my blog then its an honour for me as an admin of this blog. Thnx for giving your valuable time.Don't forget to leave your valuable comment.

              《 GOOD BYE 》